

I made the all the men in our family these fleece blankets. They love them, I think it's because I buy two and a half yards, plenty to hang over their feet, and go up to their necks, and THEN SOME. I buy two and a half yards of a print and a solid to match.
(The first fleece blankets I made were the recommended one and a half yards, which were just "lap sized" to the men. Again, they love the extra long and think they are awesome.)
Once I have all the fun of choosing the pattern and the solid fleece, I come home, dust mop the hardwood, lay it all out and get busy. Why the floor? Because I don't have a ping pong table or a pool table. These blankies are huge! A pool or a ping pong table would be just dandy for this project. I hope you have one, it will make your life easier when you work on these blankets.
Don't ask me why men go apey over logo fleece, for their favorite teams. It is unexplainable like many things are with men. But it's a guaranteed hit, unless, of course you live in a tropical locale and have no need to sit around on the couch or in the lazy boy in the evenings during the months of winter (also known as hibernation season), with a blanket on you to keep the chill off.
I like fleece logo fabric because with it, it's so easy to please--and for sure will get used.
(Please note: logo fleece is more pricey than regular, you might want to watch for a sale! I got mine at 20% off while the rest of the fleece was 50% off....at least the solid half of the blanket was fifty percent off!)
**For this tutorial, I used a small "kit" fleece blanket, because the ones I make that are 7.5 feet long would be too hard to photograph for this blog. This was a kit I purchased in which both pieces of fleece were packaged at one price.
Please note: For little ones, I buy a yard and a half. For older kids, two yards.
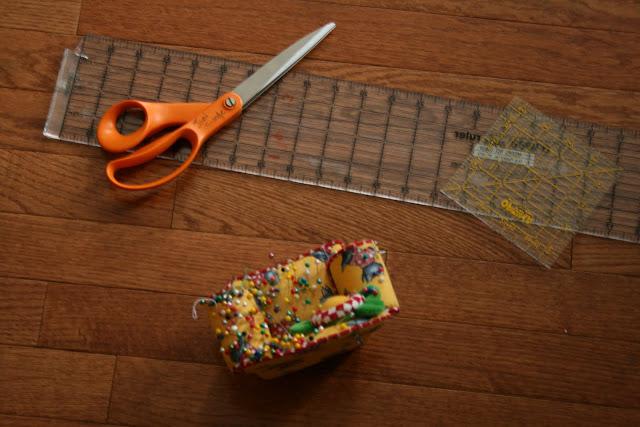
You need something to measure with (yard stick) and something for a square template for the corners and some pins. Cardboard is fine for the corner template....whatever you have.
My square is 4 x 4" and I use it for each corner and as a spacer, too.

(Sorry for the picture quality, the day was dark and I had to use flash...)
First lay your fleece pieces out at the same time and trim up the selvedge edges. Just eyeball it. This isn't rocket science and once it's all tied, everything comes out in the wash,and imperfections won't be at all noticeable! (Unless, of course, someone cut your fabric uber crooked.) Just do the best you can.

Once both selvedge edges of the pieces of fleece have been cleaned up, take some straight pins and pin around the edges about six inches in. This will hold the fleece together while you make all the cuts for the fringe, but won't interfere with your cuts that are four inches into the blanket.

All pinned and ready for the scissors.

I am placing the template on each corner,

And I cut it out.

My ruler happens to be the width of my template for the corners. You can use whatever you have but your corner template will be your spacer. Hold your fabric down with books or something in the center to help keep your pieces in place while you work. Hardwood is nice because the fabric slides around easily if you need to move it.

Remove all four corners.

(The saver part of me said to save the corners to make some bean bags for Levi to toss...so I did. Heh.)


Now we are ready to cut the fringe.

Use your square as a spacer and move it down from the corner six or eight inches and place your straight edge on top of it.

The cuts are made at ONE INCH INTERVALS. That is why a yardstick works well. What I have is used for quilt making, but don't run out and buy this stuff. If you don't have one, you could cut a straight piece of anything and use one inch markings.

Now just cut, cut, cut all the way down one side, sliding your spacer six or eight inches and making sure the straight edge is level each time until one side is completed.

Tie a knot or two at each end of each side (which is each corner of each corner).

I reached the end of the row, so I tied the knot. THIS IS VERY HELPFUL so that your blanket will not get out of line and your fringes stay matched up with each other.
The knot I tie of course, is double, first I tie one direction then the other.

Do each of the four sides in the same way.


Tying a couple of knots at each corner of each corner...

Until all your fringes are cut. There's hundreds.

And now!
REMOVE THE STRAIGHT PINS.
I repeat!
REMOVE THE STRAIGHT PINS!
(Ask me how it goes when you DON'T! Ahahaa!)
THEN...
Take your blankie to the nearest comfy chair, put in a Christmas movie, and tie, tie tie, tie!
Just keep your eye on the fringes so you don't miss one.
AND SO WHAT IF YOU DO.
If I come up with an extra one on the end of a row, I tie it into the previous knot and no one is the wiser! It all looks fine in the end.
REALLY!!
Now wasn't that easy?
Th-th-that's all folks!
Now these are not cheap, but boy, oh boy are they WARM! And no one I've ever given one to for a gift is willing to give it back. In Michigan, we need our blankies when the cold wind blows!
The nice thing about these is that they stay in place while you're using them, the fringe makes each edge of the blanket a nice weight for staying where you put it.

Now I just need to figure out a good way to wrap them.

Girl's stack.

Guy's stack.
GO FORTH AND MAKE FLEECE BLANKETS.
AND THEY SHALL MULTIPLY.
5 comments:
I am getting ready to make one of these for my niece. What perfect timing for a reminder of how to make one, its been a few years since I have! Thanks ;-)
PS- My hubby would love this one you are making, he is a big Michigan fan! I didn't know team fleece like this existed, I know what I will make him next year =)
I have made many of these blankets. I keep one of the edges I trimmed off, (usually one that curls in on itself) and use it to tie around the blanket after I have folded it length wise and then rolled it up. I wrap it around twice and tie a bow. That is how I present them. It looks nice and you can keep the "tie" to use again to store the blanket.
nancyr
I have a fleece blanket my cousin made me and I love it. It is a cat fabric.
And the Michigan Wolverine helmets are a beautiful sight to behold...! I'm sure my guys and girls would love one of these!
(sorry: I meant that for the other post.) These photo's make me wanna take some back roads, make me wanna take the long way home...
Beautiful!
Post a Comment